PS Vita is slowly coming to an end. Production of new consoles have ended some months ago and production of physical games ended a year ago for both Europe and USA which means that if you want new games you’ll have to turn to the digital store or use sites like Play-Asia to search for new physical releases.
For me PS Vita is one of the best consoles ever made, probably in par with the Sega Dreamcast and behind Super Nintendo. Although Sony totally abandoned the console to the hands of third party developers, which means that we didnt get a lot of AAA titles, it received countless awesome titles and little gems from indie devs and for many game genres, the portable nature of the console just seemed much more natural than a big tv screen inside your living room. Games like Killzone Mercenary and Ultimate Marvel VS Capcom 3 clearly showcased the power of the console in both 3D and 2D and the lack of Sony titles like an exclusive God of War, a Gran Turismo Portable or third party game titles like a Crash Bandicoot or a Spyro the Dragon (which by the way would be awesome to have on the go) could have changed the consoles lifespan and overall support.
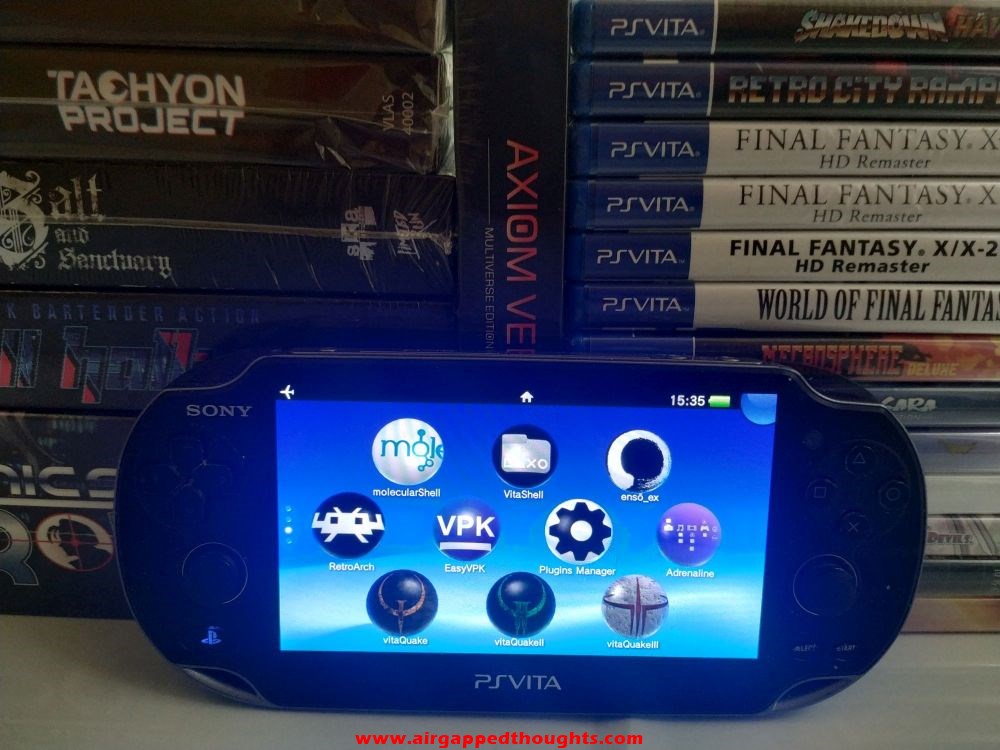
Fortunately, if you own a PS Vita and you’re bored by the lack of titles, there is a great scene of homebrew applications and games that may be able to add some value to it. These apps can give capabilities to your console that should be there right from the start, like the ability to have multiple slots for backing up your saves and the ability to use drivers for reading Micro SD cards instead of the very expensive official ones (after buying an SD2Vita adapter of course). After ‘jailbreaking’ your console you’ll be able to run a homebrew store to it and download what you want from a list of endless possibilities.
Jailbreaking of course doesnt mean just homebrew gaming and apps, but for anything more than that, and i’m saying that not just as one of the persons who are into the PS Vita scene right from the start, but also as one of the biggest PS Vita collectors, you’re completely on your own.
BEFORE YOU START
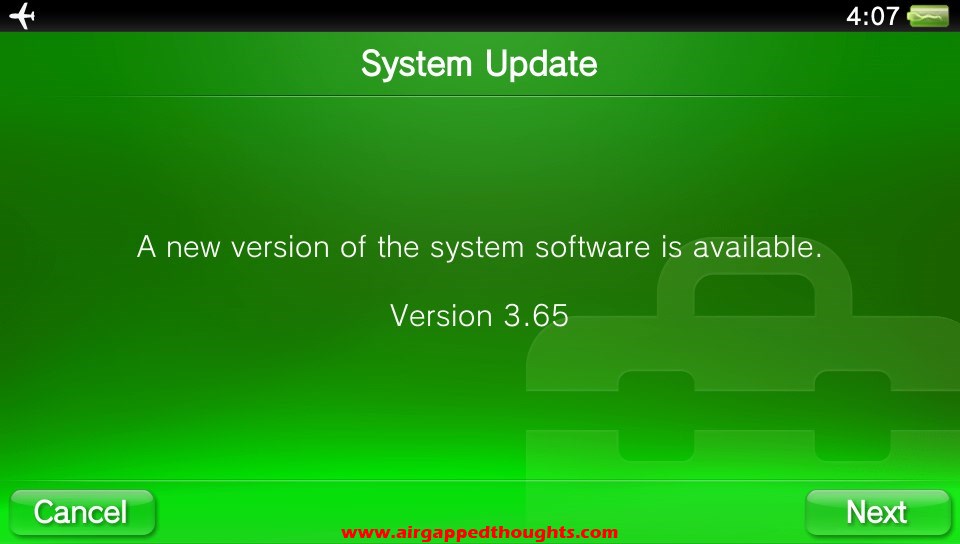
You will first have to go to the PS Vita Settings menu, and navigate to System —-> System Information and check out the System Software version.
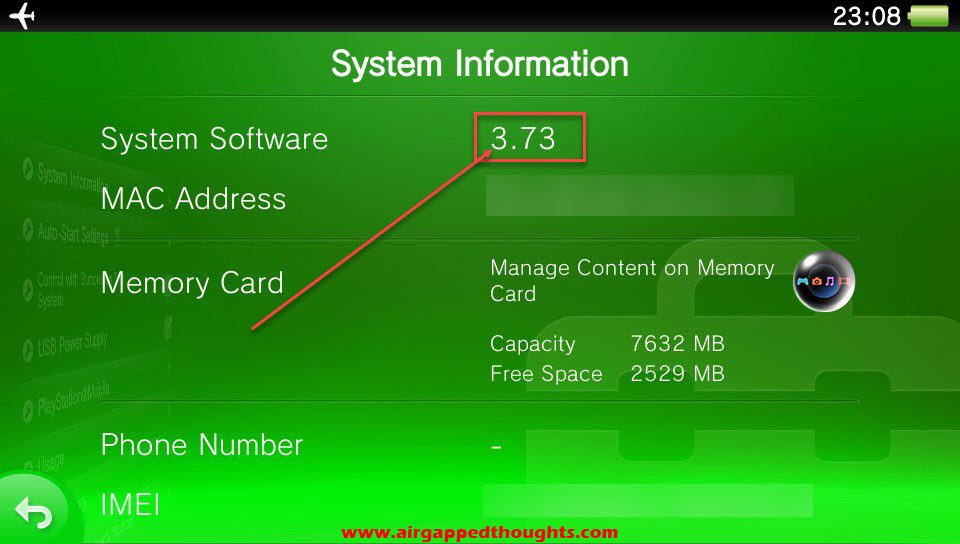
Depending on the version, you’ll have to follow a different method. If you’re lower than 3.60, update to 3.60. If you’re on 3.60 you’re staying there. If you’re higher than 3.60 the plan is to install Modoru which will let you know about the lowest possible firmware that you can downgrade to and take advantage of it. You should only care about 3.60 (best compatibility, ability for permanent jailbreak), 3.65 (the first hackable firmware after 3.60, ability for permanent jailbreak), 3.73 (easy upgrade by just choosing “System Update” & “Update Using Wi-Fi” through the Settings, fairly easy jailbreak, can’t have a permanent jailbreak).
Because the whole procedure can get a bit complicated, you should follow the table below which will guide you to the right part of the walkthrough, depending on the firmware you’re currently in. You should also backup everything to your computer using QCMA before proceeding (your saves, videos and pictures / screenshots, games can be downloaded again from the psn store)
| FIRMWARE VERSION | REQUIREMENT |
| 1.50-3.57 | 1) Can’t jailbrake. Follow the MANUALLY UPDATING FIRMWARE section to update to 3.60 and then follow the 3.60 requirements from below. |
| 3.60 | 1) Follow the 3.60 JAILBREAK section to install HENkaku You are now jailbroken and you can start enjoying your new device. You can optionally install ENSO which will make HENkaku permanent. |
| 3.61-3.63 | 1) Can’t jailbreak. Follow the MANUALLY UPDATING FIRMWARE section to update to 3.65 and follow the 3.65 requirements from below. Alternatively, go to Settings —> System Update —> Update Using Wi-Fi and update your system which will throw you to 3.73, and follow the 3.67-3.73 requirements from below. |
| 3.65 | 1) Follow the 3.65-3.73 JAILBREAK section to install HENkaku. You are now jailbroken and you can start enjoying your new device. You can optionally install ENSO which will make HENkaku permanent, or continue with the second step to see if you can downgrade to 3.60 2) Follow the DOWNGRADING TO 3.60 OR 3.65 section to learn about the lowest firmware you can downgrade to by using Modoru. Depending on the Factory firmware result, you can follow [A] or [B] [A] If Factory firmware is lower or equal to 3.60, downgrade to 3.60 and then follow the 3.60 requirements from above. [B]. If Factory firmware is higher than 3.60 you’re staying on 3.65. Follow the INSTALLING ENSO FIRMWARE section to make HENkaku permanent. |
| 3.67-3.73 | 1) Follow the 3.65-3.73 JAILBREAK section to install HENkaku You are now jailbroken and you can start enjoying your new device. You can optionally continue with the next step to see if you can downgrade to 3.60 or 3.65, both will give you the ability to install ENSO which will make HENkaku permanent. 2) Follow the DOWNGRADING TO 3.60 OR 3.65 section to learn about the lowest firmware you can downgrade to by using Modoru. Depending on the Factory firmware result, you can follow [A] [B] or [C]. [A] If Factory firmware is lower or equal to 3.60, downgrade to 3.60 and then follow the 3.60 requirements from above. [B] If Factory firmware is higher than 3.60 but lower than 3.67, downgrade to 3.65 and then follow the 3.65 requirements from above. [C] If Factory firmware is over 3.65, you’re staying where you are and just enjoy your HENkaku enabled device. |
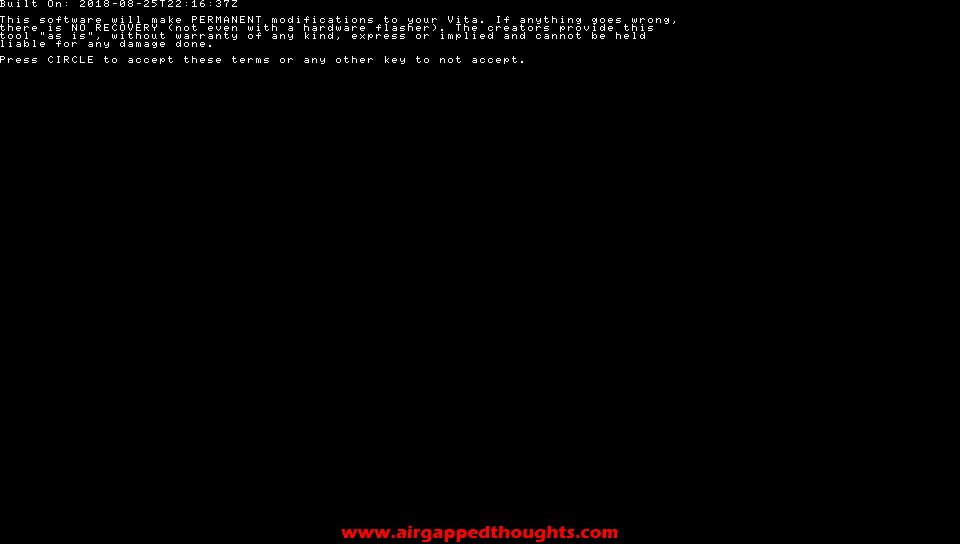
3.65-3.73 JAILBREAK
Things you are going to need:
1. A PSN Account linked to your PS Vita. If you don’t have one, make one. If you already have one, it’s better to remove it and use a dummy account. Before unlinking your psn account and link a dummy account, you should backup everything to your computer. You wont lose files, but it’s better not to use your normal account while going online with a jailbroken PS Vita.
2. QCMA (for communicating between your PS Vita and your computer)
3. Final H-Encore (for enabling homebrew on 3.67-3.73)
Install QCMA in your computer and run it.
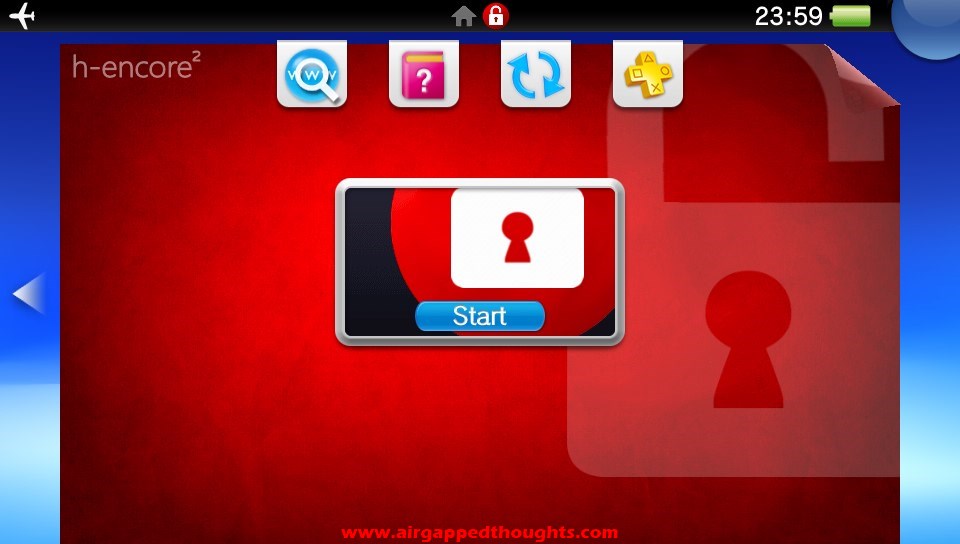
Install the final h-encore2 application and run the FinalHE.exe file. The application will wait for a PS Vita connection.
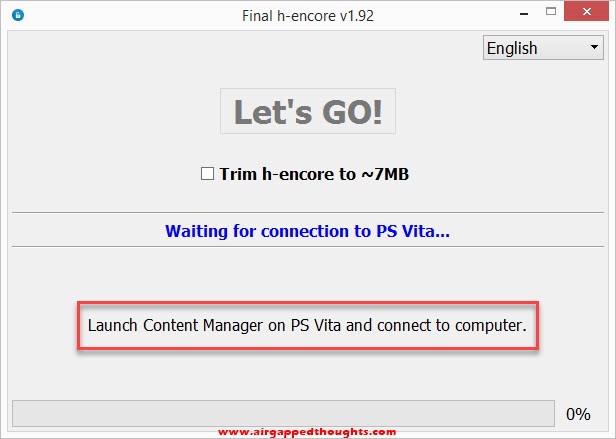
Go to the Live Area of the PS Vita and open up the Content Manager application and connect your PS Vita to the computer. Final h-encore should recognize your console and show your PSN ID on the windows.
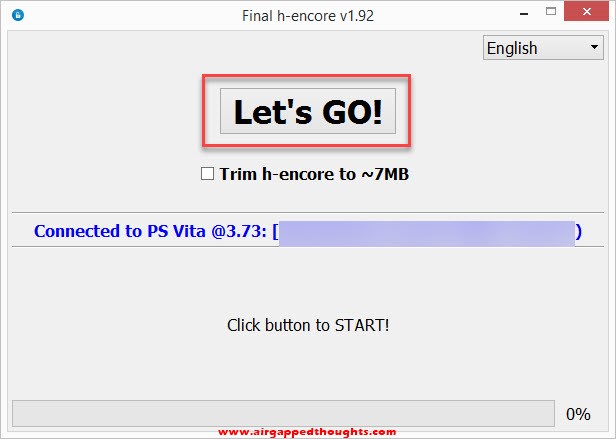
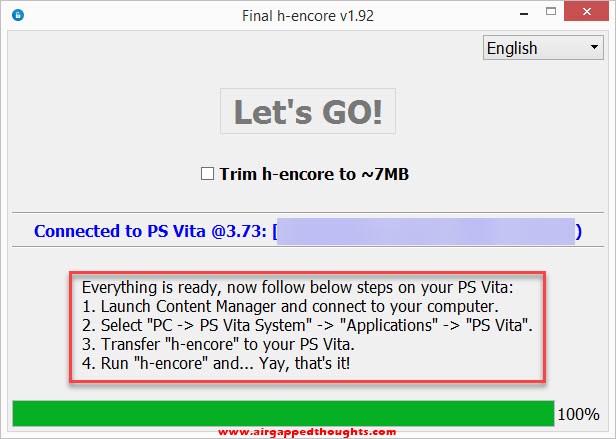
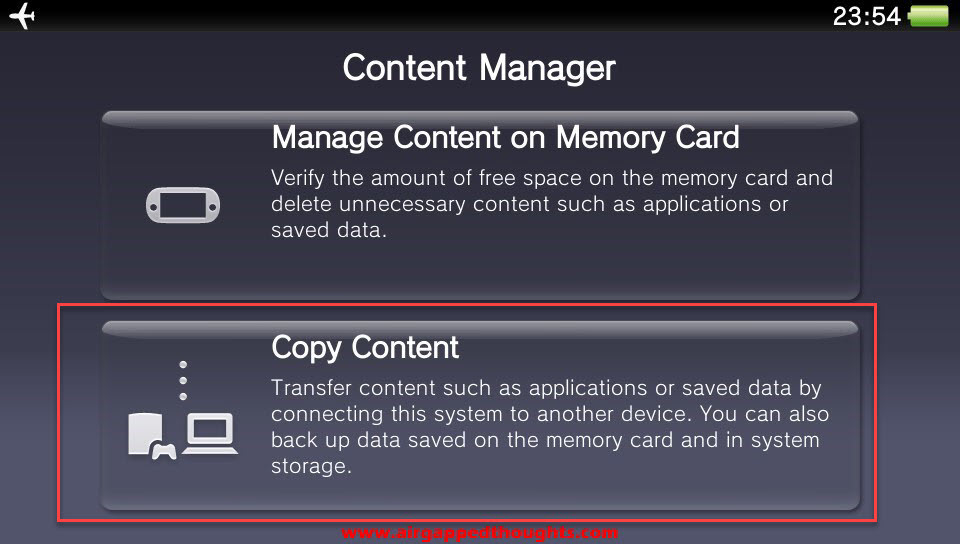
You’ll have to proceed by pressing the “Let’s GO!” button. The application will download and package some files which must be sent to the PS Vita so go back to your PS Vita and to the Content Manager, choose “Copy Content“, “PC —-> PS Vita System“, “Applications“, “PS Vita” and you’ll find the h-encore2 application. Choose it, and press the “Copy” button.
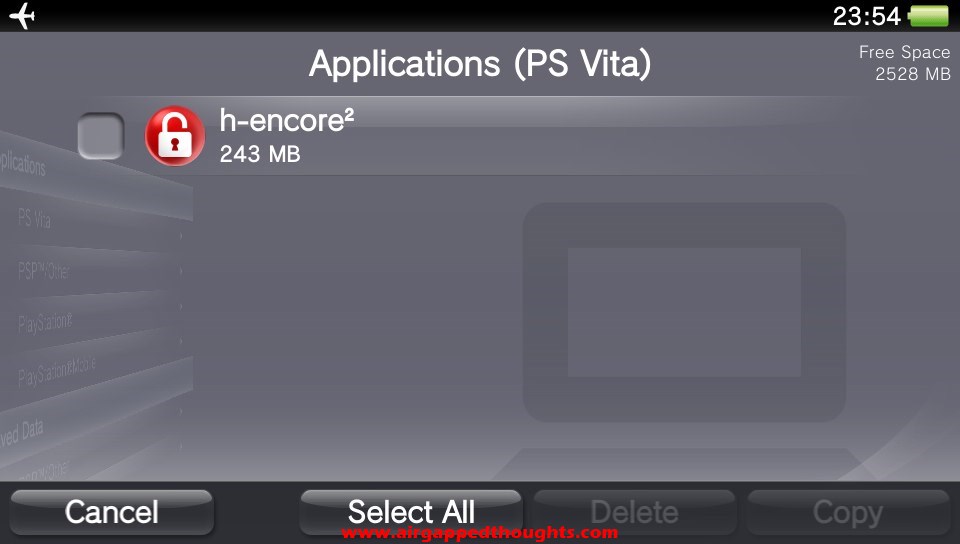
You can now find the h-encore2 application in the LiveArea of the PS Vita. Run it and from the available options choose “Install HENkaku”. Sometimes PS Vita might crush and restart, retry till you get a Success confirmation.

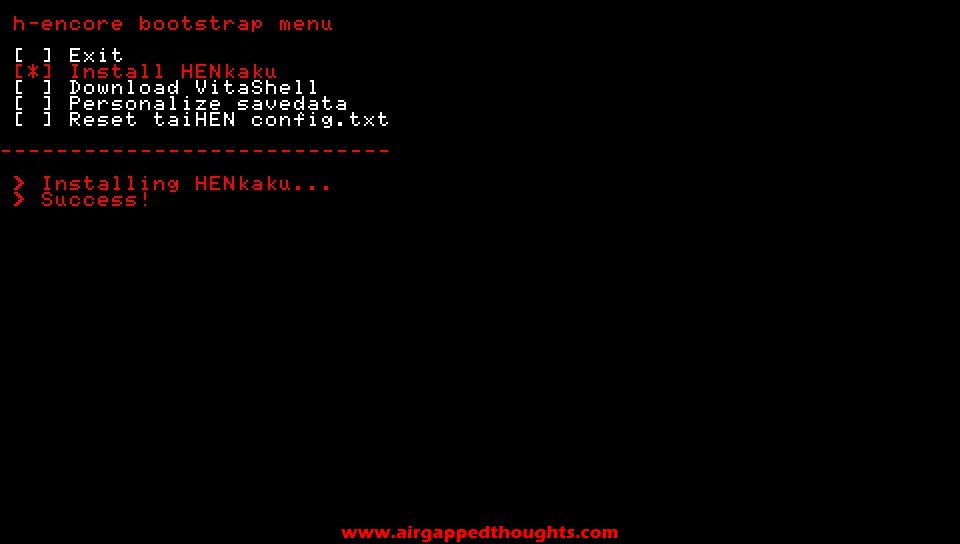
Congrats! Your PS Vita is now jailbroken!
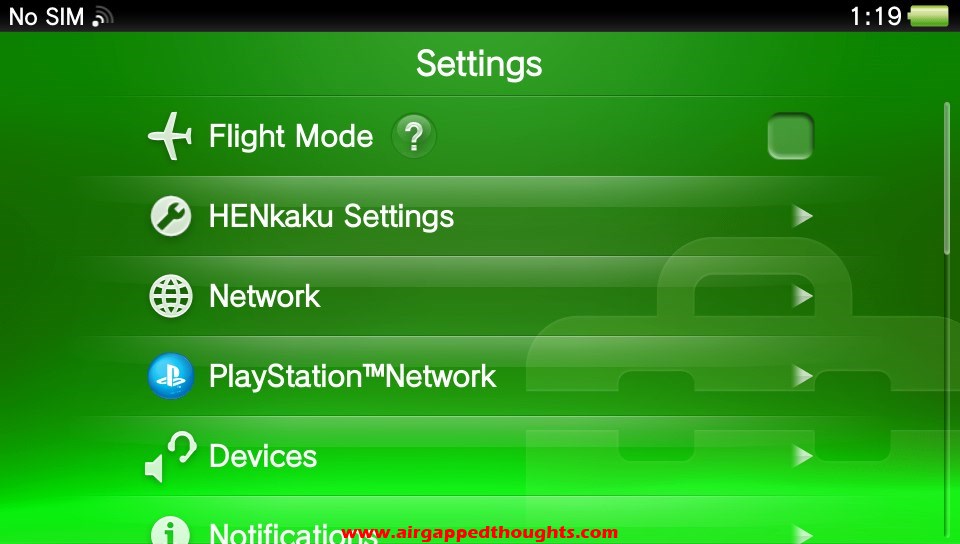
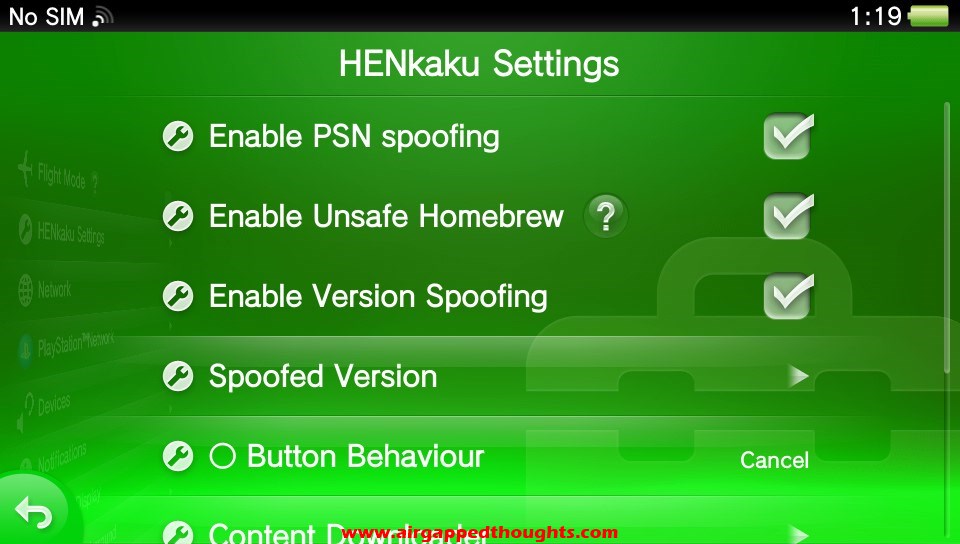
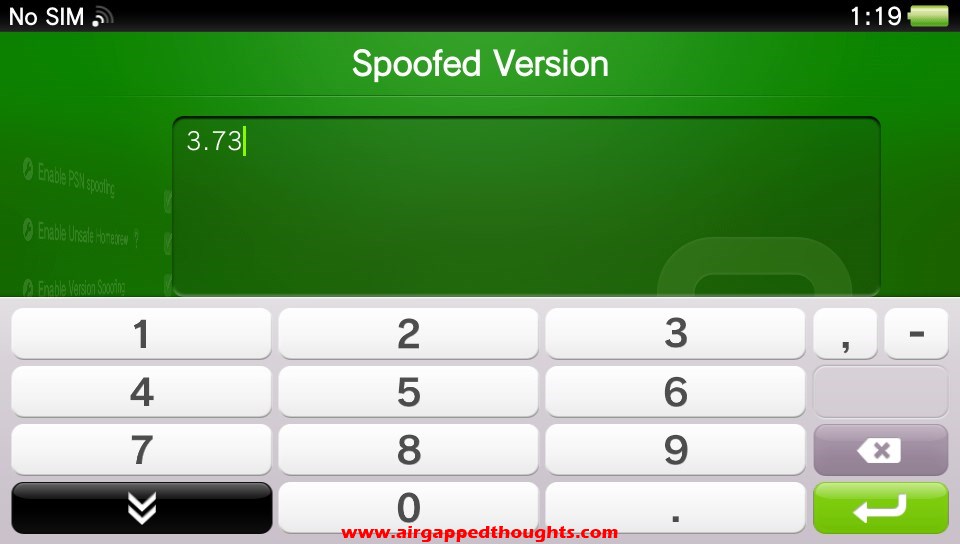
Go to Settings and you’ll find a new option “HENkaku Settings“. Go there and tick the option “Enable Unsafe Homebrew“. You should also change the spoofed version to 3.73 to prevent updates.
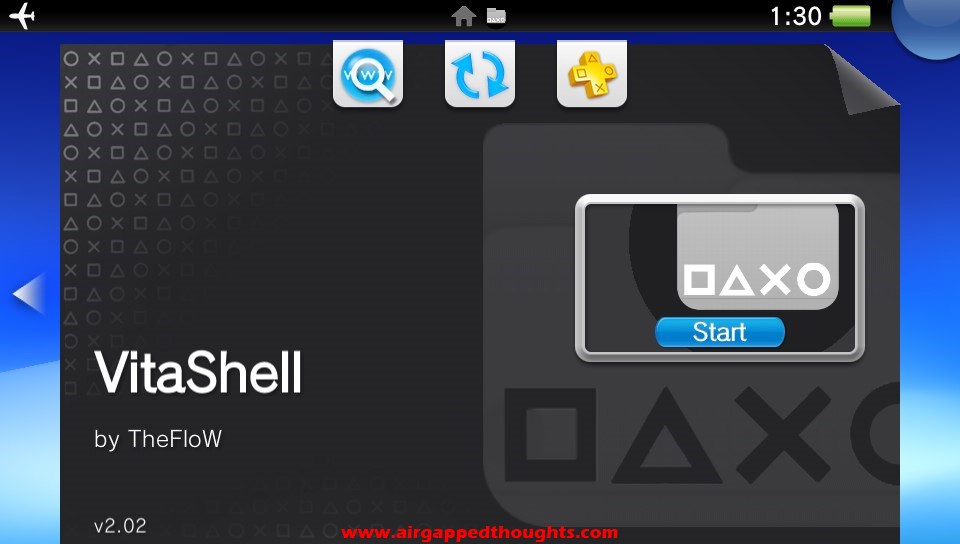
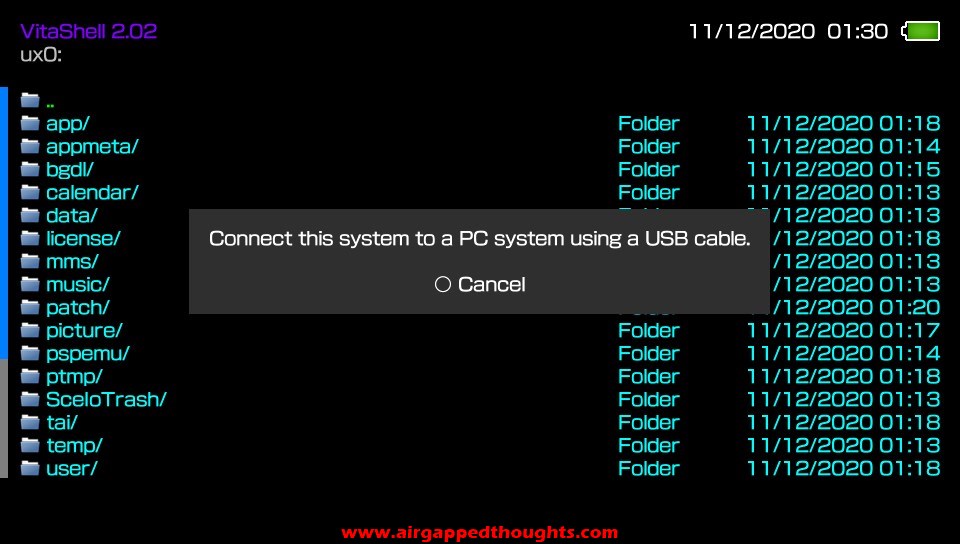
If you’re on 3.65-3.73 connect to a WiFi network and go back to the h-encore2 application and this time choose the third option “Download VitaShell”, this is file manager with many useful features like the ability to connect to your computer as a USB Mass Storage device. Open up VitaShell and press the Select button to enable that mode and send anything you want to your PS Vita (app / games / plugins, check at the end of this guide).
If you’re on firmware 3.67-3.73 you can stop here if you want with a temporarily custom firmware which you will have to rerun after every reboot (by opening the h-encore2 application and choosing Install Henkaku), or proceed to the next step to see if you can downgrade to 3.60 or 3.65, both will give you the ability of Enso (permanent custom firmware). If you’re already on 3.65 you now have the option to install it (just go to the INSTALLING ENSO FIRMWARE section) and of course you can use the DOWNGRADING TO 3.60 OR 3.65 section to see if you can go to 3.60.
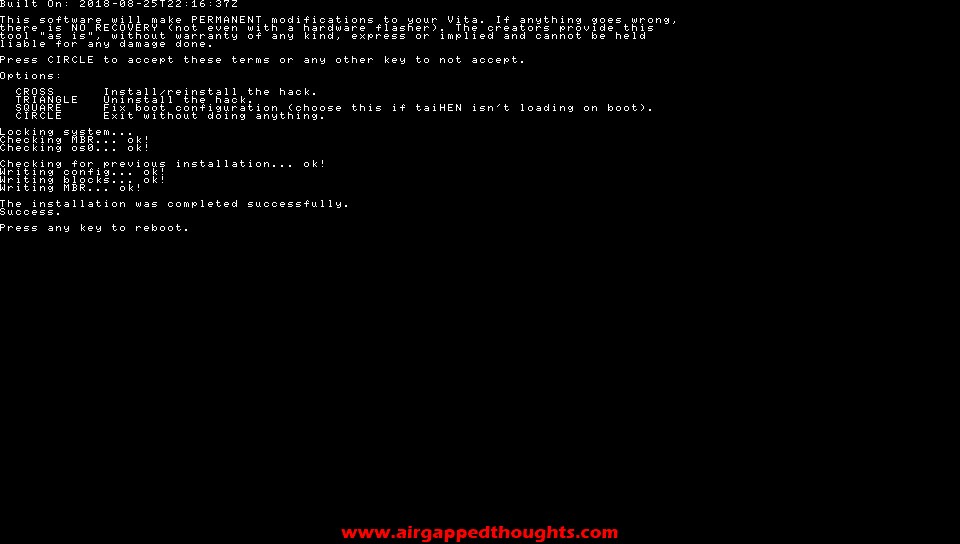
DOWNGRADING TO 3.60 OR 3.65 FIRMWARE
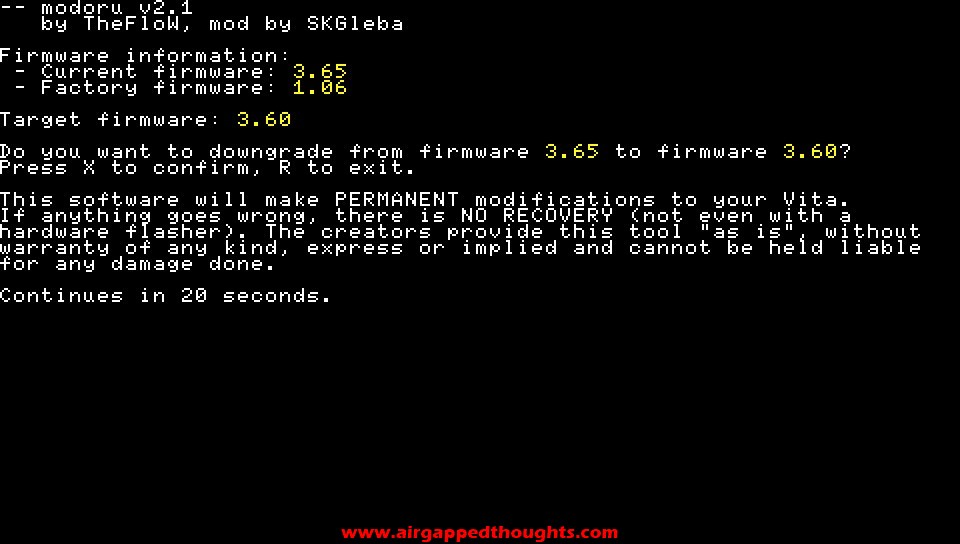
Download Modoru 2.1 (downgrading tool), send it to your PS Vita, install it with VitaShell and run it.
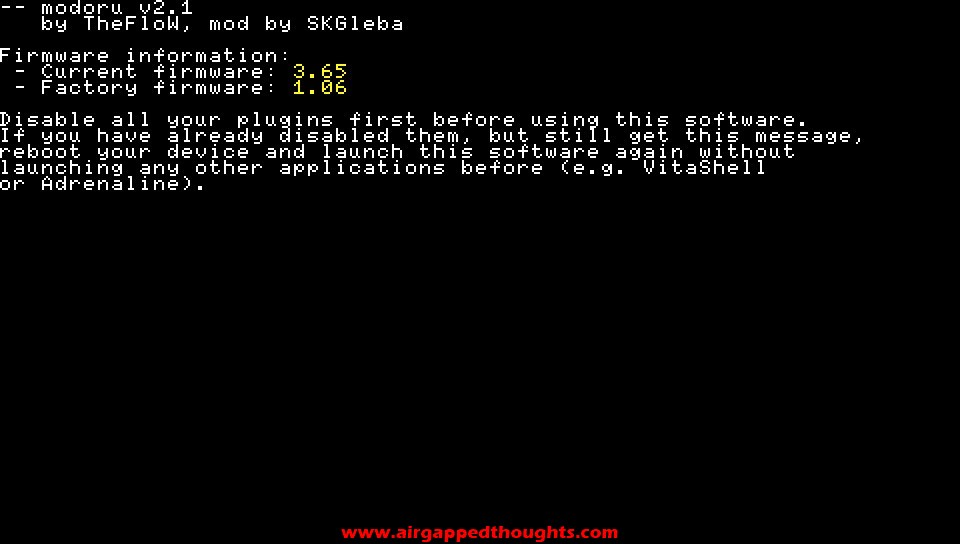
It will give you a very important information which is the Factory firmware information. You can’t downgrade to a lower firmware than the factory firmware, if you have a PS Vita slim model there’s always a chance that you wont be able to downgrade to 3.60 or even 3.65. If your factory firmware is lower than 3.60, download 3.60. If it’s higher than 3.60 but lower or equal to 3.65, get the 3.65 firmware. If it’s higher than 3.65, you can completely ignore the rest of the guide and start playing with your new PS Vita since you can’t downgrade to anything more worthy. In the above picture the Factory firmware is 1.06 since i’m using the very first PS Vita model. This means that i can downgrade to 3.60 without a problem.
Open the 3.60 / 3.65 zip file you just downloaded and inside you’ll find 3 more zip files. You need to extract PSP2UPDAT.PUP file from inside the PSVita OFW 3.60 complete.zip / PSVita OFW 3.65 complete.zip file and send it to the PS Vita, inside the APP/MODORU000 folder. If you can’t see that folder from your computer, just copy it anywhere to PS Vita and use VitaShell to move it to MODORU000 folder.
Using VitaShell, go to ur0 partition and rename the tai folder to something else and then go to ux0 partition and do the same to that tai folder. Run Modoru again.
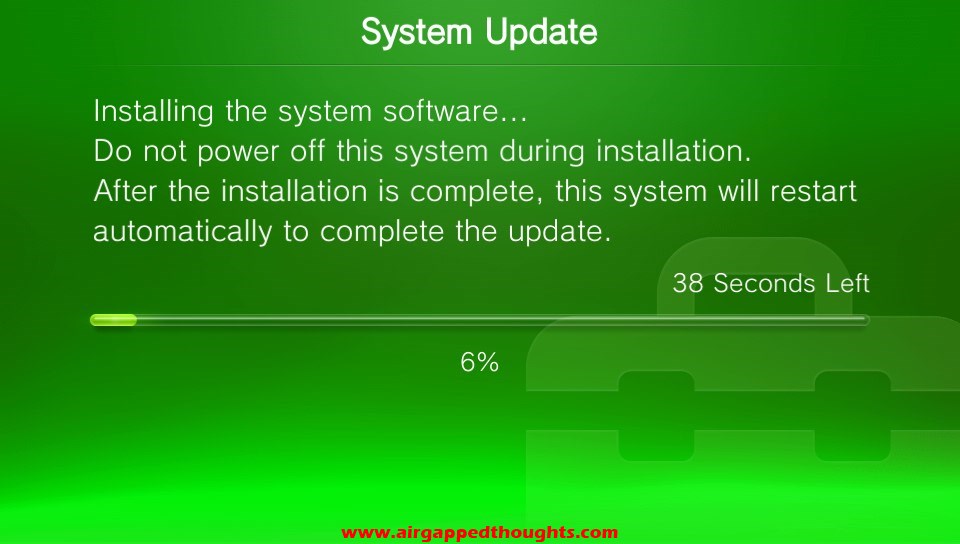
After a warning about the downgrade process, you can proceed by pressing the X button.

3.60 JAILBREAK
You’re now on the best firmware ever! This is the only firmware that can have Henkaku by just visiting a simple website and most homebrew are based on this version so you’re getting the best compatibility. My advice is to factory reset your PS Vita before proceeding any further so you can have a clean 3.60 version without useless applications installed, besides, you wont be using any of the previous apps anymore. Don’t forget to backup any personal data if you still haven’t done so. You wont be needing QCMA anymore which means that you wont be needing a PSN account linked to the console anymore.
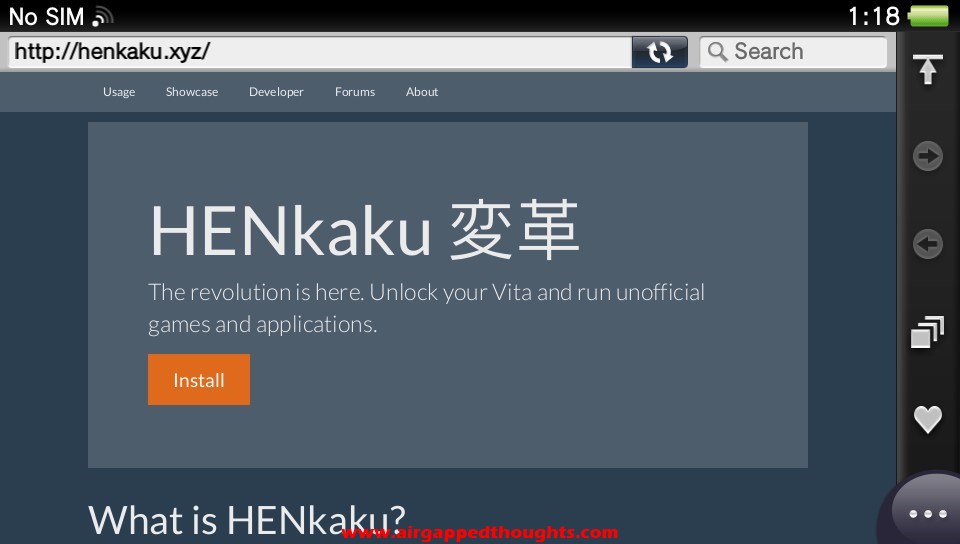
Download VitaShell to your computer. Connect your PS Vita to a WiFi network, open PS Vita browser and visit the henkaku.xyz webpage. This is a page specifically made for PS Vita. By pressing the “Install’ button, your PS Vita will get jailbroken.

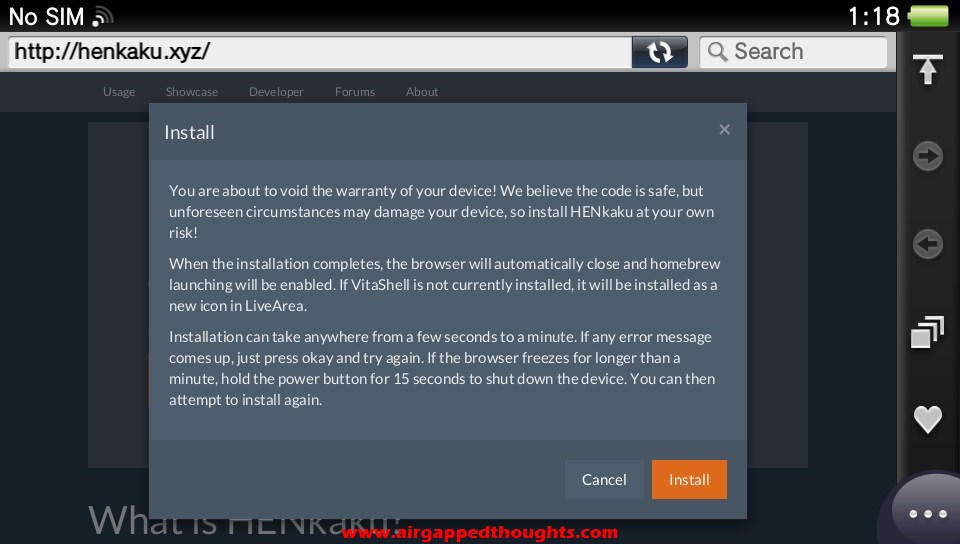
It might get a few tries / errors but keep trying till you get it.
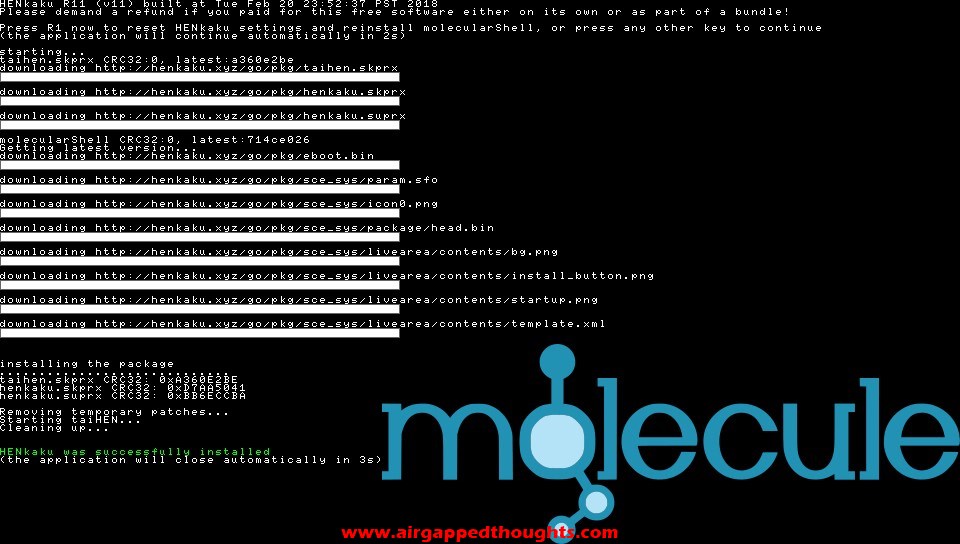
Congrats! Your PS Vita is now jailbroken!
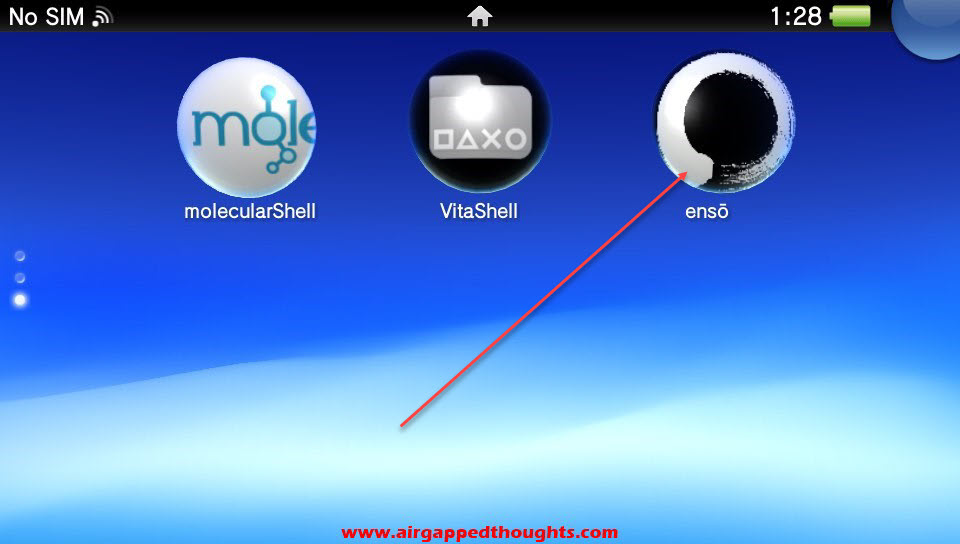
You will also get the Molecular Shell file manager in the LiveArea a good but kind of basic file manager, we are going to use it to install VitaShell.
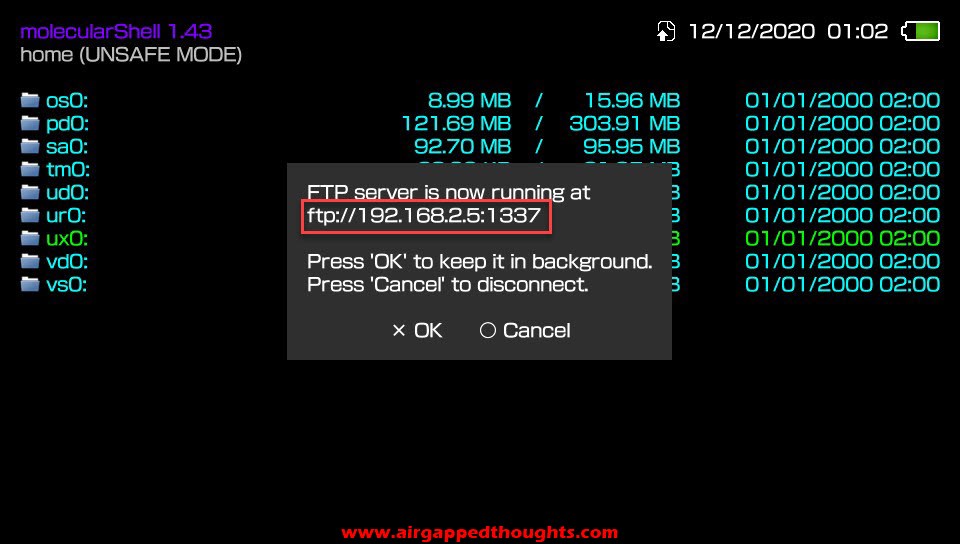
Once again, go to Settings / HENkaku Settings and Enable Unsafe Homebrew. You should also change the Spoofed Version to 3.73. Open Molecular Shell and press the Select button to start FTP Server. It will give you an FTP Address, you can use an ftp client to connect to that address or just use the default file manager of your operating system (Windows support FTP in the address bar of Windows Explorer, just by typing ftp://).
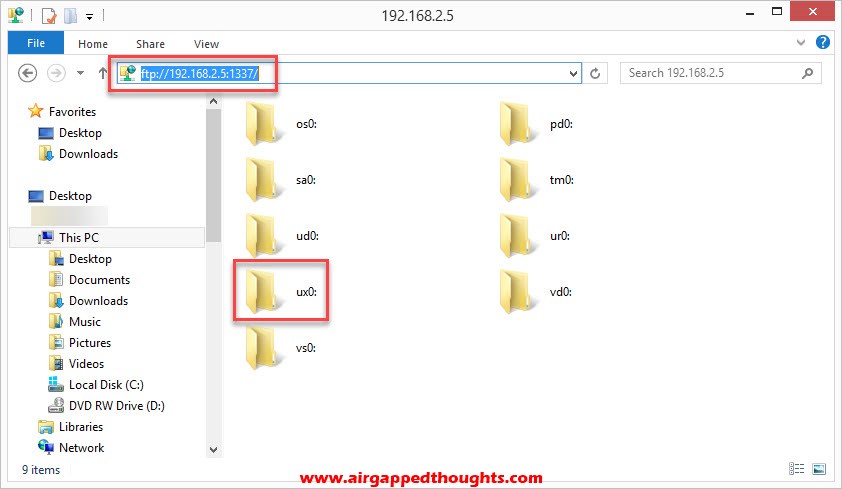
When you get access to PS Vita storage, send VitaShell.vpk inside the ux0 partition (that’s the memory card partition), open Molecular Shell and install it by clicking in the vpk file.
You’re now ready to play or proceed with the installation of Enso permanent firmware.
INSTALLING ENSO FIRMWARE
Enso will give you the ability to keep Henkaku permanently without having to repeat previous steps after every reboot. To install it, download the VPK file from here if you’re on 3.60 version or the Enso_ex from here which is for both 3.60 and 3.65 firmware. Send it to your PS Vita and install it through Vita Shell or Molecular Shell. Open the application and press the X button to install it, or the triangle button to remove it if you ever want to format your PS Vita and return to the normal state.
Keep in mind that only these two firmwares are compatible with Enso, do not attempt to install it on any other firmware and do not install the simple Enso on 3.65.
MANUALLY UPDATING FIRMWARE
Manually updating will prevent your PS Vita to update to the latest 3.73 firmware and instead, update to a firmware of your choise. You will only need to manually update your PS Vita firmware in 2 occasions:
1. If your current firmware is lower than 3.60 and you need to update to 3.60
2. If your current firmware is 3.61-3.63 and you need to go to 3.65 to enable homebrew / Enso and possibly downgrade to 3.60.
Keep in mind that you can only upgrade with that method and not downgrade.
You should first block automatic updates by going to Settings, Network, Wi-Fi Settings, choose your WiFi network, go to Advanced Settings, and change Primary DNS to 212.47.229.76
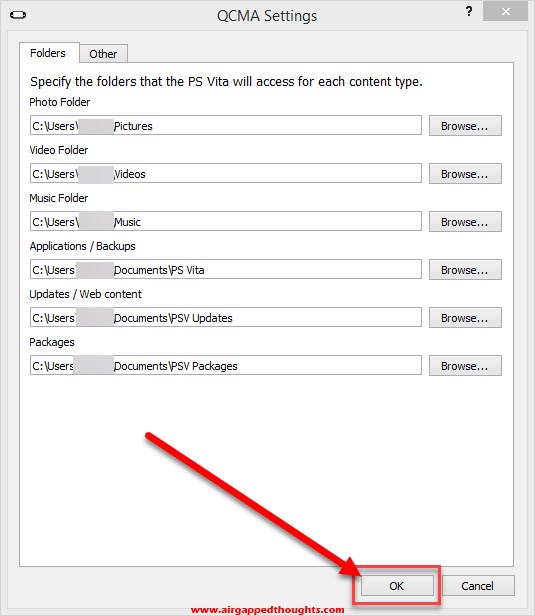
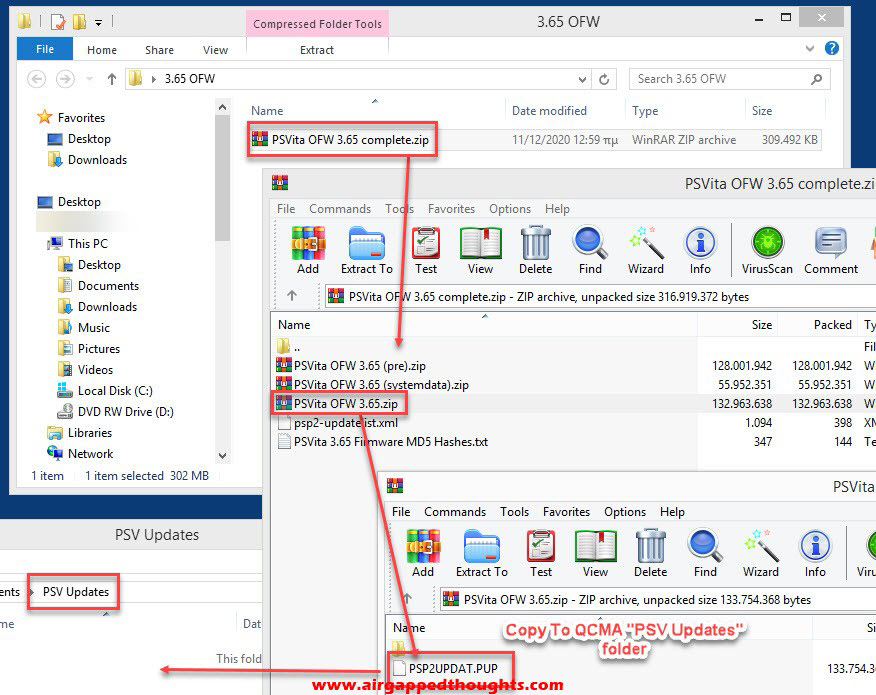
Download the firmware that you want to upgrade to (3.60 | 3.65). Extract the PSP2UPDAT.PUP file from inside the PSVita OFW 3.60.zip or PSVita OFW 3.65.zip and place it in the default PSV Updates location that QCMA is using (the default one is inside the Documents folder).
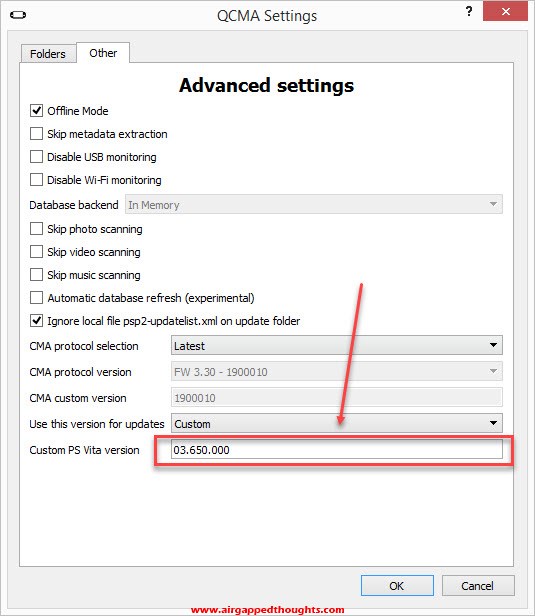
Right click the QCMA icon in the taskbar and go to Setting and from the program windows go to “Other“. Change the Use this version for updates to FW 3.60 (Henkaku) if you want to upgrade to 3.60. If you want to upgrade to 3.65, choose Custom and edit the “Custom PS Vita version” field to 03.650.000.
Right click the QCMA icon and refresh database.
Now connect your PS Vita to your computer, go to Settings, System Update, and Update by Connecting to a PC. If all went well, you’ll receive a message about a new firmware version (3.60 or 3.65 respectively) instead of 3.73 which is the latest firmware.
Proceed with updating and you can then proceed to 3.60 JAILBREAK or 3.65-3.73 JAILBREAK sections.
WHAT TO DO AFTER INSTALLING HENKAKU?
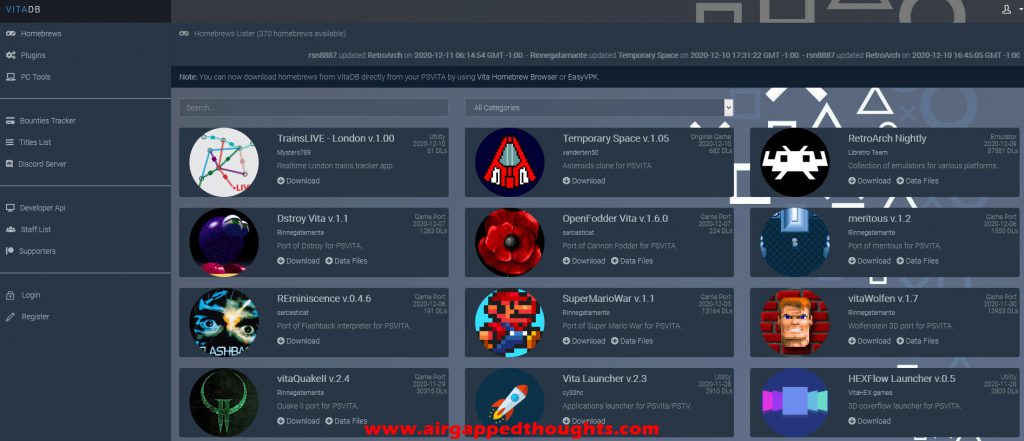
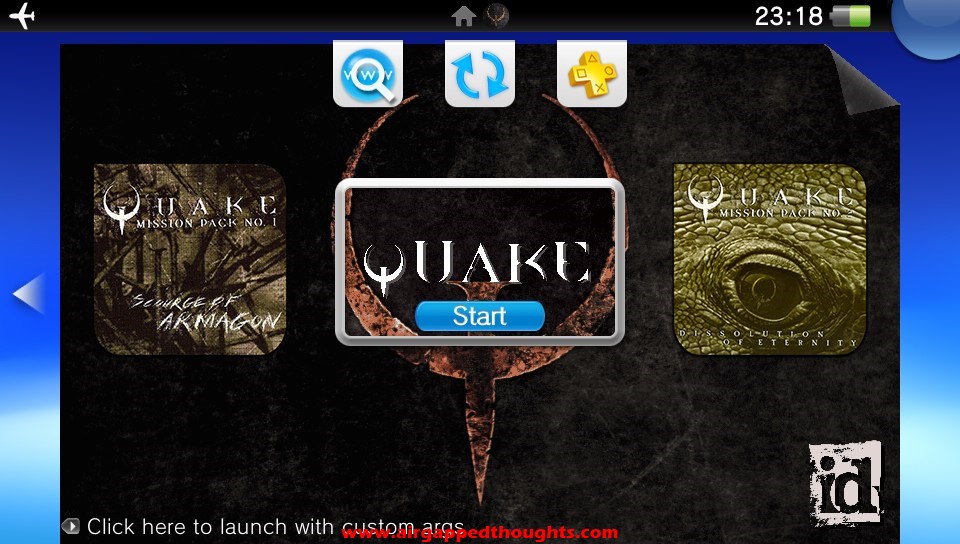
You can now install homebrew applications and games. You can find them all over the web and they come with a VPK extension. You will have to send them to your PS Vita and install them by using VitaShell. A great source of PS Vita homebrew stuff is here, just find something you like, press the Download / Download VPK button, and send it to your PS Vita for installation through VitaShell.
You can also install this application to your PS Vita which is a homebrew store and will let you download homebrew apps and games directly through the device without having to do anything manually, it’s actually a frontend of the previous web store.
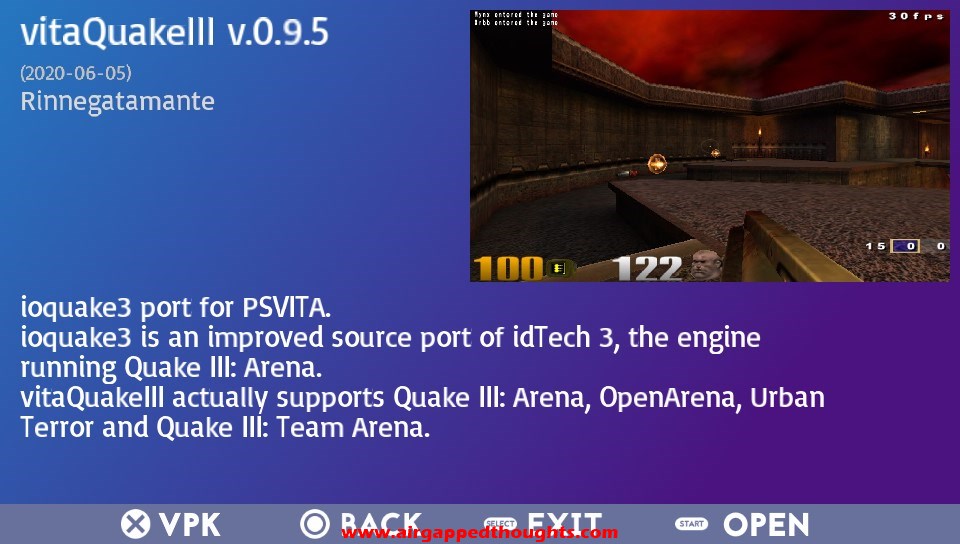
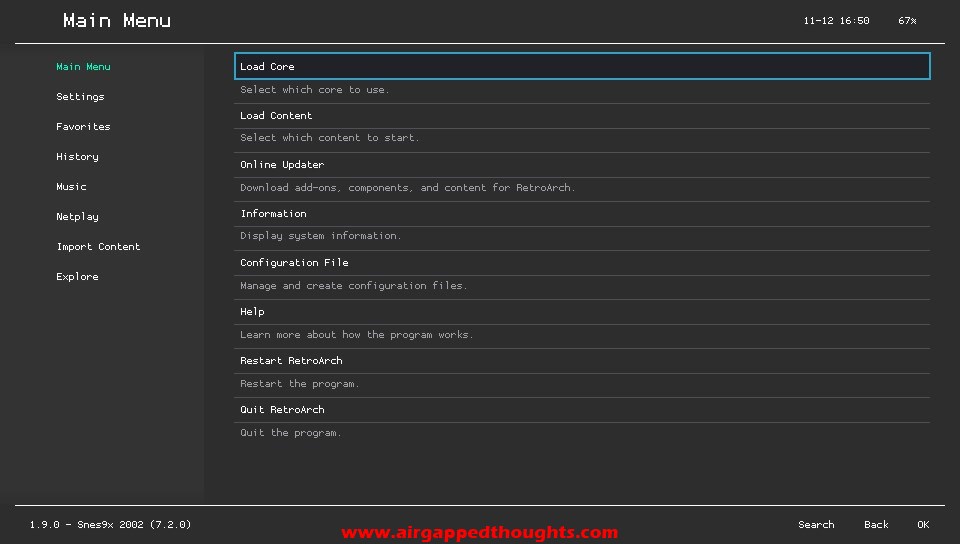
And do not underestimate the RetroArch application which can emulate most old consoles, there’s a PS Vita version too!

PLUGINS
Henkaku gives you the ability to install not only homebrew applications and games, but plugins too. These can add new features to the PS Vita and run as services in the background and some of them are extremely useful, for example you can use your Dual Shock controller with your PS Vita or stream your PS Vita screen to your computer through USB connection for recording the action. You don’t install them like VPK files, you just have to place them in the tai folder (inside ur0 or ux0 partition), and open up the config.txt file that you’ll find there and add their location to that file. (for example if you download the dejavu plugin (dejavu.skprx), move it to tai folder inside ur0 partition and in the config.txt file add the line ur0:tai/dejavu.skprx).
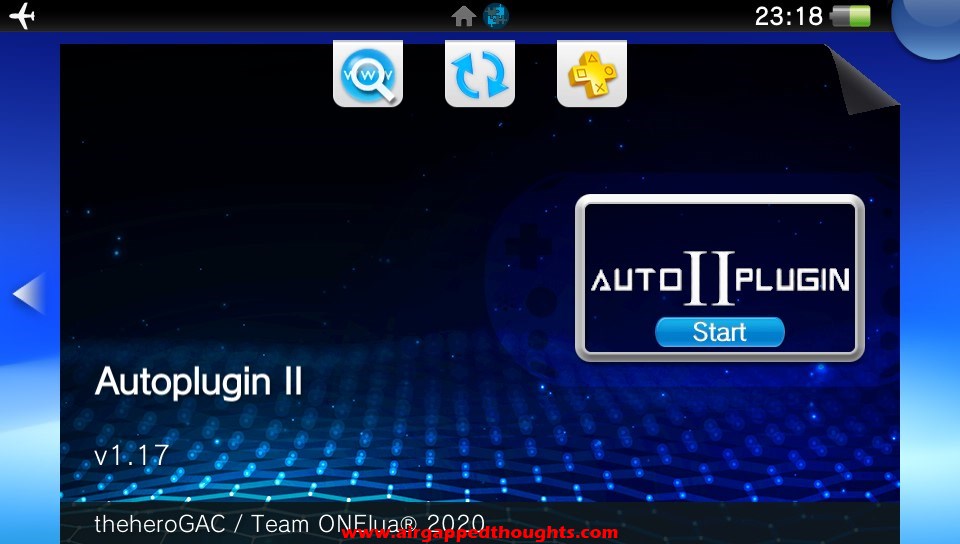
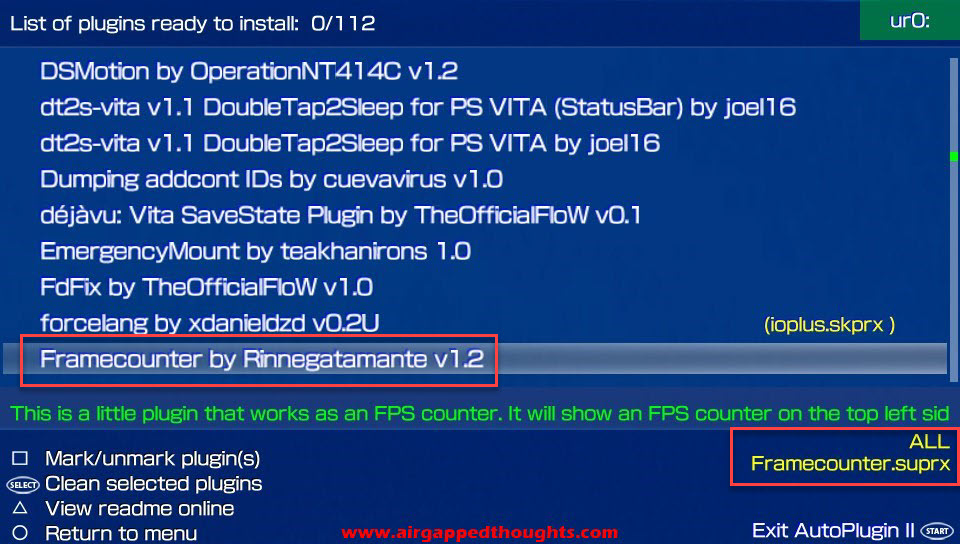
The config.txt has various sections though and you will have to know where each plugin must go. If its a kernel plugin it goes under the *KERNEL line. There are also main and all plugins that must go under the *MAIN and *ALL sections. Fortunately, there are applications that download and edit the config.txt file by themselves like the AutoPlugin 2. Let’s have a quick demonstration of its usage.

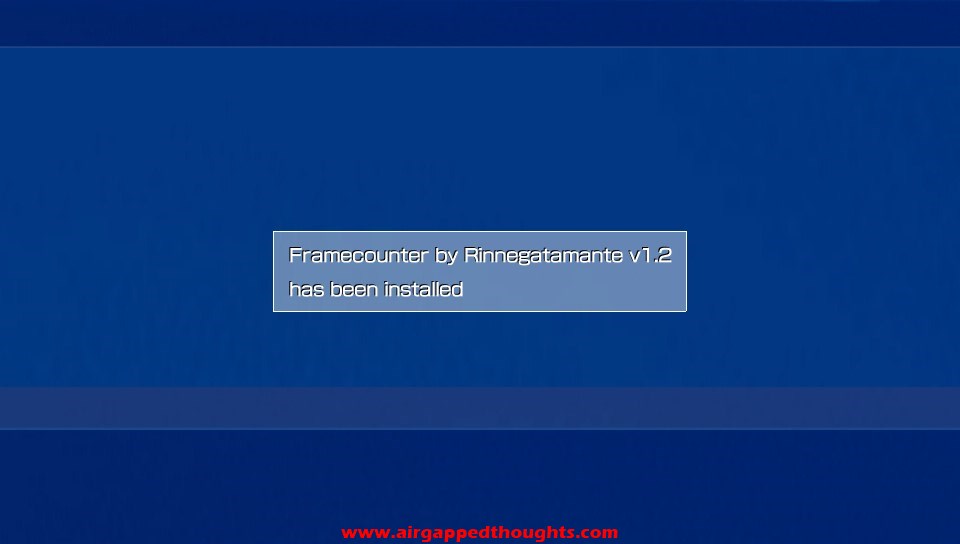
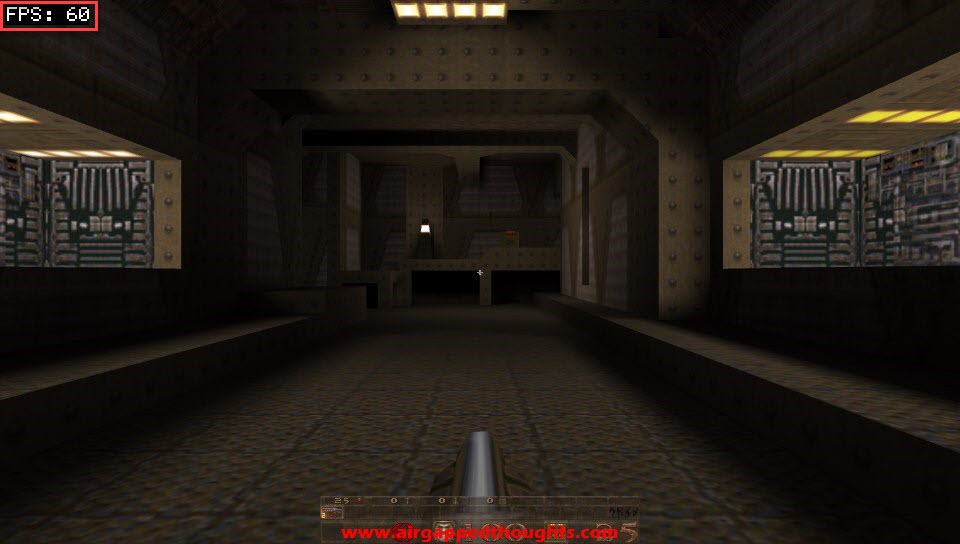
We are going to download the Framecounter plugin which shows current frames on the top left corner of the screen. Just find the plugin through the app and press X on it. Notice at the bottom right corner the ALL entry, it shows the changes that will happen in the config.txt file.
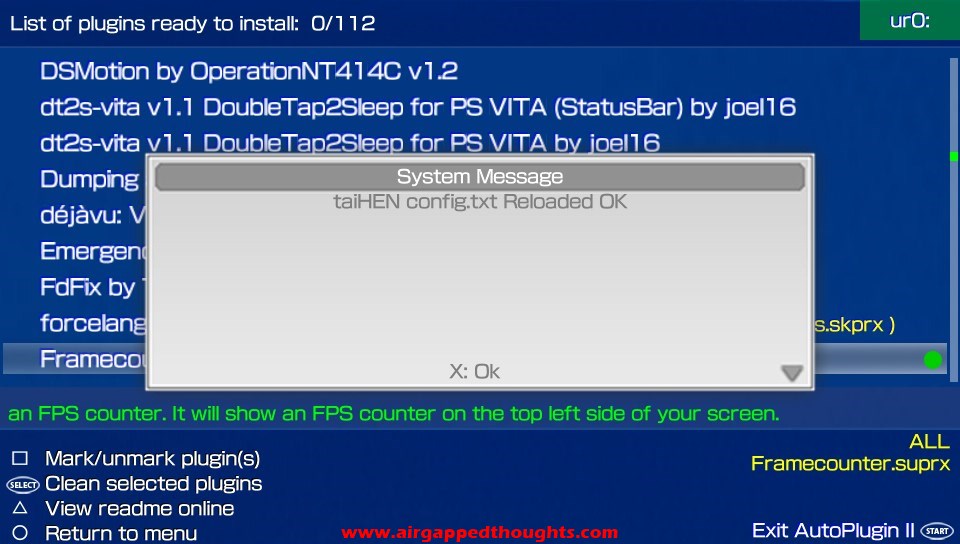
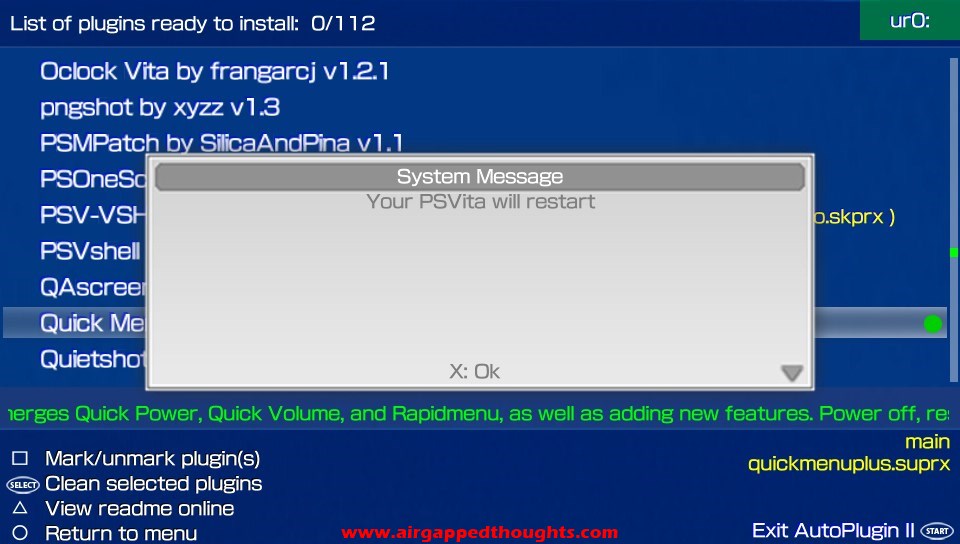
After automatically editing the config.txt file, it automatically reloads the changes so that the new plugin can start working. If it’s a kernel or a main plugin, a restart of the device will first take place.
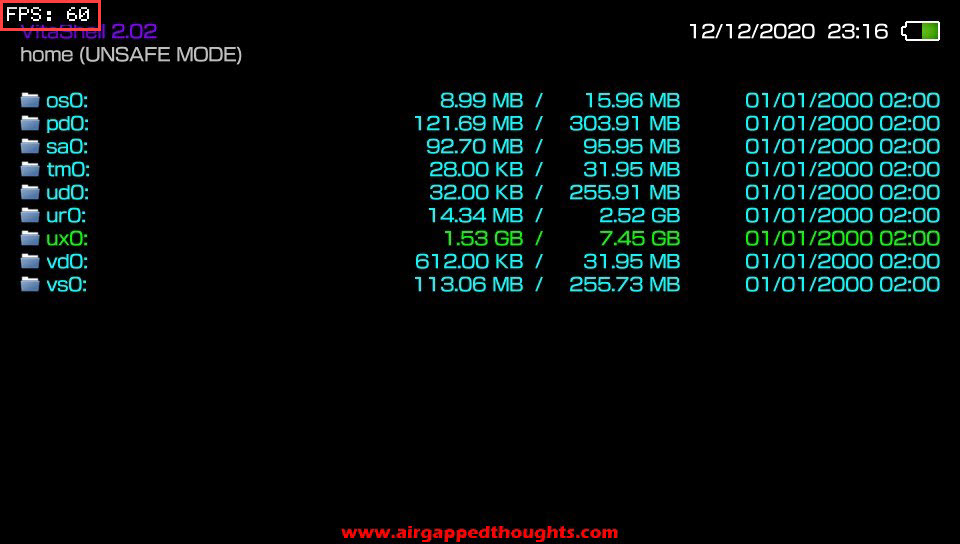
Now if we open an application, an FPS Counter will appear.
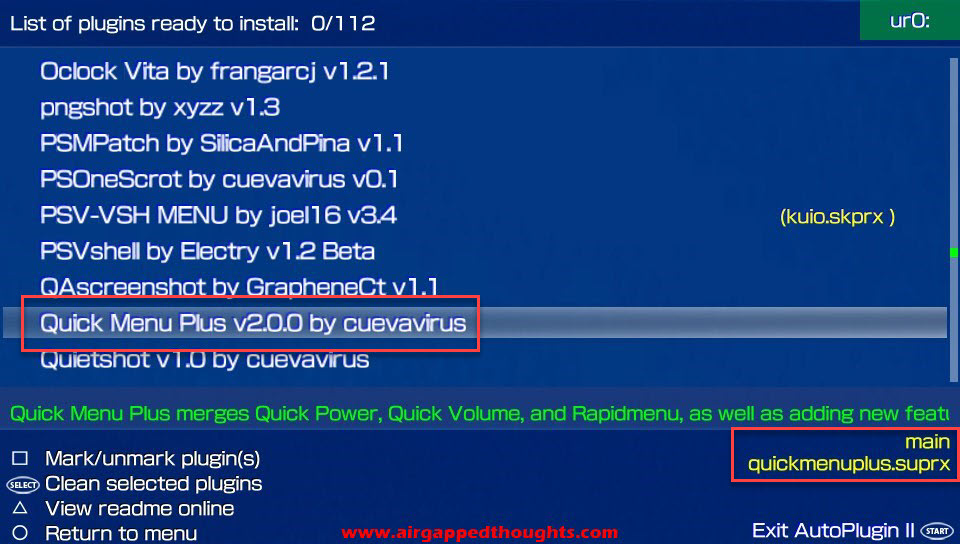
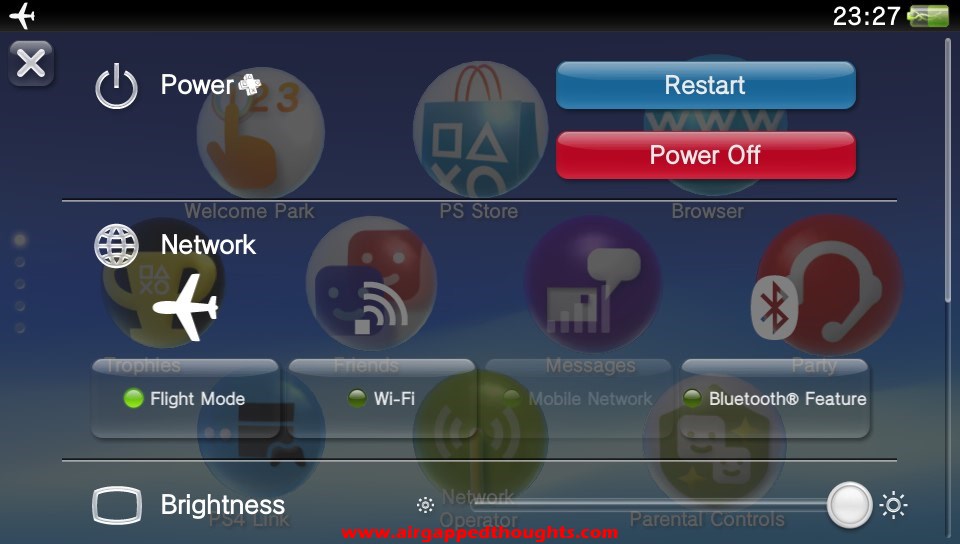
Let’s install another plugin, this time is a main plugin called Quick Menu Plus. This is going to add some features in the PS button menu. It will also add the quickmenuplus.suprx entry under the main section in the config.txt file.
This is the old PS button menu, before installing the plugin.
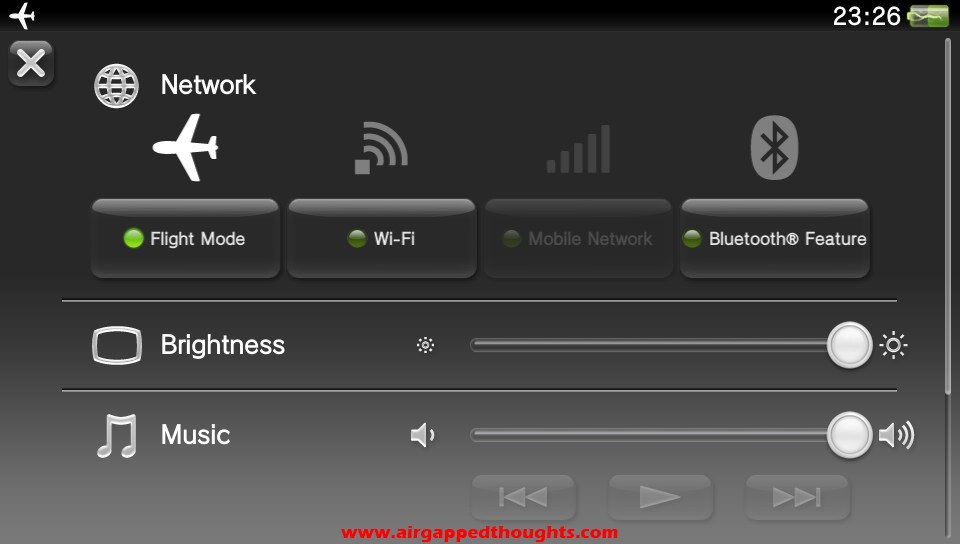
And this is the new one.
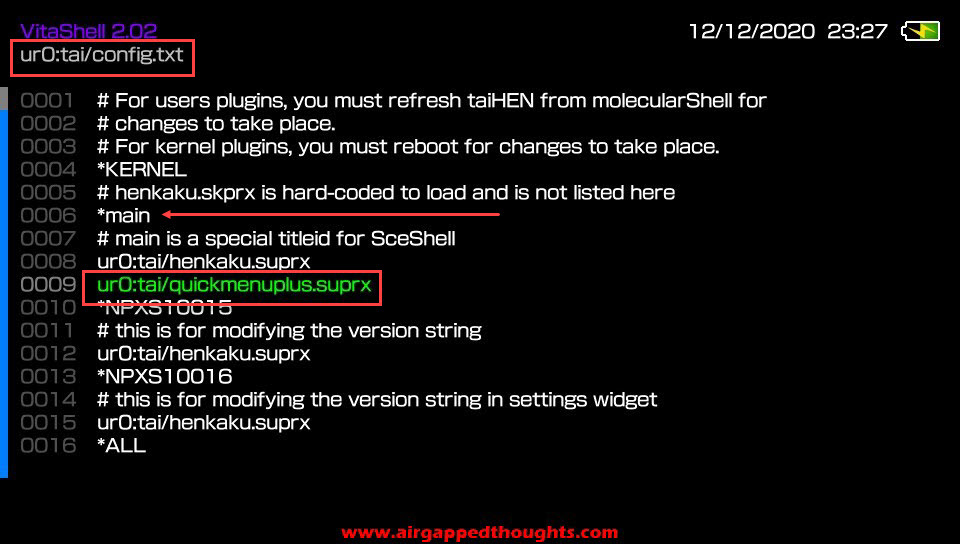
We can also navigate to ur0:/tai and open the config.txt file and see the changes in that file. We can clearly see the Quick Menu Plus entry under the main section: ur0:tai/quickmenuplus.suprx
Finally, you can find another great source of plugins here.
Have fun!!
